
HC-05 Module (this is the exact module that was used in the video, but others similar to it should work)
DB-9 Connector (you can use the one that came in the FDM-DUO’s accessory pack, but requires soldering. The one pictured below is a crimp on connector. No soldering required)
Jumpers (if you don’t get a HC-05 module with the included jumpers, you will need some of these female to female jumpers. Way more than you need here, but hard to find in smaller quantities)
Raspberry Pi Kit (A Raspberry Pi, most any will work. However if you are buying one for the first time, probably the Raspberry Pi 3 kit would be best. You will find other uses for it for other radio based projects)
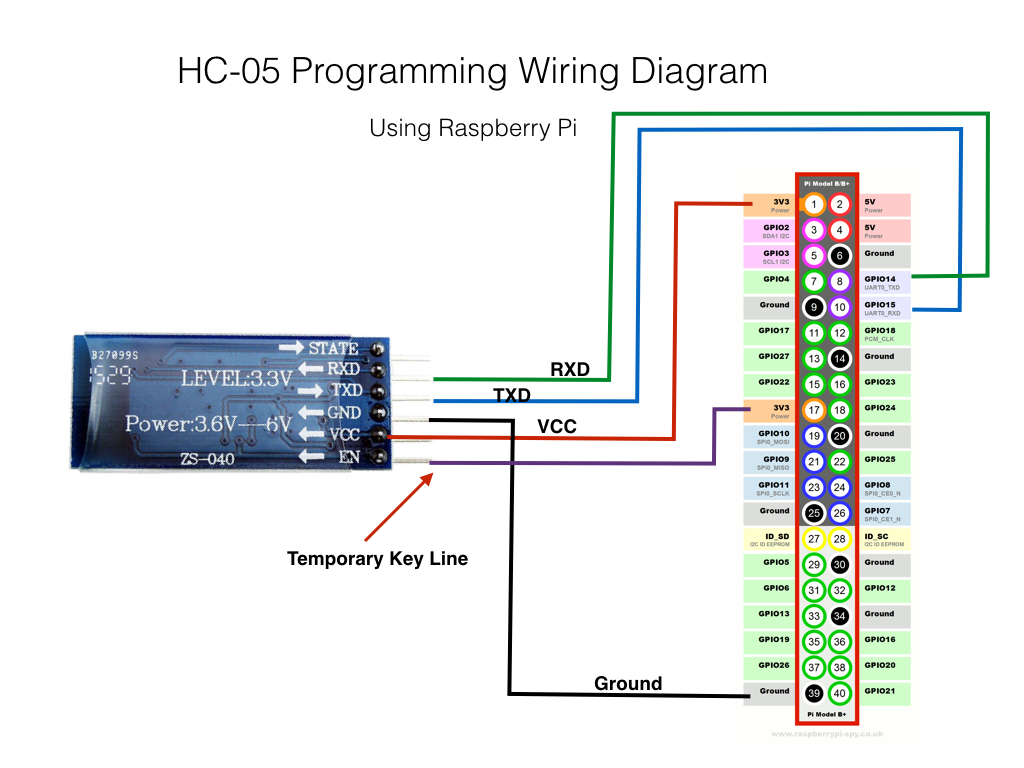
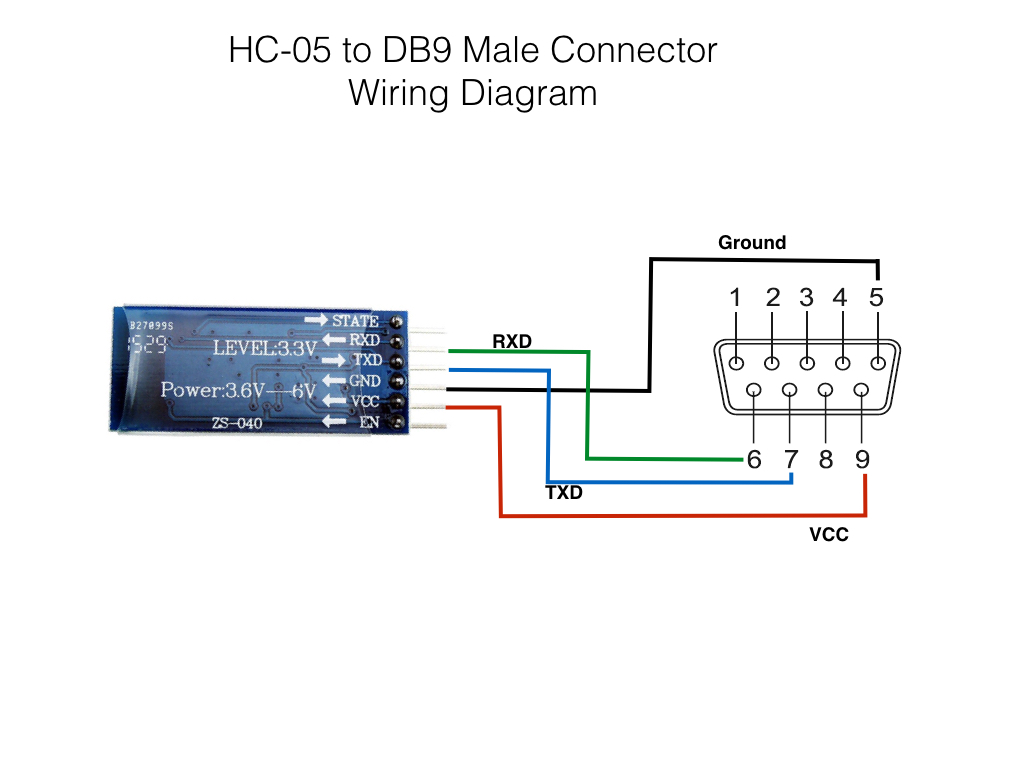
Wiring Diagrams (click to enlarge)
Android Phone or Tablet (You are on your own for this one)
With the new Raspberry PI 3, the things changed a bit.
1) Raspberry PI 3 uses ttyAMA0 for Bluetooth, so you have to use /dev/Serial0
2) The serial line must be enabled in /boot/config.txt using the line
enable_uart=1
3) due to the limitation of the UART used, that relies on CPU clock, in /boot/config.txt the cpu speed has to be fixed using the line
core_freq=250
4) In the graphical configuration (Menu “Settings” – “Raspberry PI configuration”) in the “Interfaces” tab (or in the terminal with sudo raspi-config), the “Serial” interface may be enabled (or not), this does apparently not harm.
5) To avoid the occupation of the serial line by a console you have to verify in /boot/cmdline.txt that the parameter console has no reference to things like serial o dev but only to tty1 or similar
6) In case of an already present errno 11, it could be of help to try to stop login consoles on /dev/ttyS0 using the command
sudo systemctl stop serial.getty@ttyS0.service
(With the most useful help of Giovanni, HB9EIK).
Weird problem have the BLUEDUO APP paired fine with HC-05 module now BLUEDUO , I can change bands, modes NB NR , have both Spectrum and Waterfall but no Frequency or S-meter readouts, Also not sure if the line of Vol Mod BW under the Freq. is supposed to change.
Running a Samsung Galaxy Tab S with Lolloipop.
Any ideas greatly appreciated , Still usable but not complete.
Thanks
Cliff
I successfully programmed two HC-05’s using your excellent instructions! Thank you! However a second set of chips starts in the Program Mode (slow flashing red LED with no blue LED visible) I can proceed with programming (Using Pi and Cutecom) but device is recognized… Shouldn’t these chips start in the Operate Mode? Thoughts?
unfortunately, this is not working for me. I’ve followed step by step the instructions (also the ones for Pi3) and I can’t still have a connection on serial0… any ideas?
Vitor,
I had to do some juggling to get the hardware UART connected to the GPIO pins. Here is a link to a process to do exactly that. Worked for me the first time.
http://spellfoundry.com/2016/05/29/configuring-gpio-serial-port-raspbian-jessie-including-pi-3/
The “virgin” HC-05 came up at 34800 baud in my case. I started with the baud rate at 9600 and worked my way up. One caution, close the device change the baud then open the device again with Cutecom. Also, try the version command a couple of time, if the wrong baudrate makes an error it takes a few characters to get it cleared out.
Bob – N4RFC
I would pay to have one build for me if someone will do it. Contact me at w4hyi@yahoo.com.